Make simple loops

Make simple loops

Making a simple loop is essential to producing durable and professional quality jewelry. For this skill you will need three tools: round-tipped( also know as ‘rosary’) pliers, chain-nose pliers, and as good a wire cutter as you can afford.

The photos show step-by-step how a bead link with two simple loops is created. However, the method I’m teaching here will work whether you make two loops with wire and a bead to create a link, or you make a headpin-based dangle earring with one loop at the top.

1. Round-tipped or rosary pliers, for forming curves and loops. 2. Chain-nose or needle nose pliers, for bending straight angles, opening and closing completed loops, and holding objects. 3. My personal wire cutter, “Mr. Chompy”. 4. Miscellaneous objects to use as mandrels or forms for different loop sizes than the round-tipped pliers.

Make simple loops using 20 gauge or heavier wire, because a lighter gauge of wire may be too weak to hold the shape of a simple loop. Use the heaviest gauge wire that will go through a bead (usually 20 gauge wire).

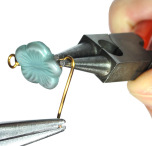
Hold the spool and the end of the wire firmly in one hand, and use tools with your other hand. Thread bead onto wire. Snip off the end tip with your flush cutters so that the end is clean-cut. The wire should stick 3/8” (or 11mm) out of the bead.

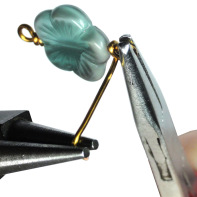
Bracing with your hand holding the bead on its wire, use your chain-nose plier to bend the 3/8” length of wire at a 90 degree angle, pointing away from you. The 90 degree bend starts where the wire comes out of the bead. Your tool hand is palm upwards. Your other hand braces the work. After you’ve made the angle bend with the needle-nose pliers, change to the round-tipped pliers to make the loop shape. To start, gently grab the tip of the wire with the round-tipped plier. 

Curl the wire over the curved back of the plier’s top jaw by curling your tool hand towards yourself. When making this movement, I think of an ocean wave curling towards the shore.

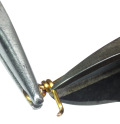
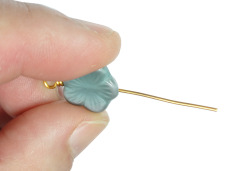
You have created the loop shape. Gently nudge the wire end towards where the wire is coming out of the bead, and nudge it so it touches the end of the bead and is closed. Inspect the shape of your loop to ensure it looks like a round balloon, not a letter P or off-center. If your loop isn’t perfectly centered above the bead, adjust its position with the chain-nose pliers.

To complete your link, turn your work upside down and repeat the steps listed above. If you’re making a loop for a headpin earring dangle, make sure the beads are pushed all the way down the headpin, no gaps, before you make a loop.

Here is how you manage opening and closing the loop without ruining its shape. Use the needle-nose pliers to open and close your loops. Push the wire end forward like opening a door, and push it firmly closed when you are done. Always check your work to ensure the loop is really closed, otherwise it may fall off what it is linked to.

Practice makes perfect, so use inexpensive art wire and base metal headpins to get your technique right, before using more expensive metals. Above all, work methodically, step-by-step, don’t try to combine steps, and – most importantly – use the correct tool for each step. Learn to make simple loops, whether you use my method or another method that you find elsewhere that works better for you, whatever it takes.

Always check your work.

As well as making your work more durable, good simple loops simply looks better, and shows professionalism, pride in your workmanship and solid mastery of technique. Happy beading!

Wrapped Loops

Wrapped Loops

You can create your own wrapped loops!

The photographs are of work with 20 gauge wire, although the technique can be used with other gauges of wire.

You’ll use three tools:

1. Round-tipped pliers sometimes called “rosary pliers”
2. Chain-nose or ‘straight’ pliers
3. Good flush cutter (a wire cutter capable of cutting cleanly, the best you can afford)


To start a wrapped loop, bend 1-1/4” of wire at an L-shaped angle with your chain-nose pliers.


Right at the bend, grip gently between jaws of round-tipped pliers. Bend the angled inch of wire over the top of one of the round-tipped pliers’ jaws.


You’ve made the top part of the loop, now make its underside. Take the top jaw out of the wire. Wrap under and around the lower jaw to form the underside.


Hold the loop in a gentle grip with your chain-nose pliers, lengthwise. With the very tip of your round- tipped pliers, grab the little tail and wrap twice, two neat wraps at the base of the loop.


After you’ve wrapped the loop, use your flush cutter to trim off excess wire.


If you’re making a link with wrapped loops on either end: thread the bead onto the wire with the wrapped loop you’ve just made, and pinch the bead so that its base is firmly against the wrapped loop.


Bend the wire coming out of the bead at an angle, wrap over top and bottom of the jaw of the round-tipped pliers and wrap twice around, just as you did at the beginning of making the link. Work step-by-step, and use the proper tools at each step, and you will have consistent and attractive wrapped loops.

Make a five-petaled flower

Make a five-petaled flower

five-petaled flower earrings

Make a pair of five-petaled flower earrings!

Wire together five top-drilled beads to make a graceful five-petaled flower.

  • Skills needed: use of round-tipped and chain-nose pliers, and wire cutters
  • Tools: round-tipped pliers; flush cutters; chain-nose pliers
  • Materials (for pair of earrings)
  1.  two 20″ lengths of 26 gauge art wire
  2.  pair of earwires to match wire color (can be sterling silver, 14K gold-filled, or niobium, whatever matches best.
  3. eight matching 4 or 6mm pearls or round beads
  4.  ten matching beads, top-drilled side to side (briolette style).
    Top-drilled beads good as petals

    Use any top-drilled bead as a petal

Continue reading

Wire up a pendant with a Czech button

Wire up a pendant with a Czech button

Front view of pendant

Front view of pendant

Here is a way to use Czech buttons and wire to make a pendant. You will need 18 gauge wire for the frame and 26 gauge wire to secure the button to the frame. In this example I use art wire, although you may choose to use sterling silver, 14K gold-filled, or copper wire.  Art wire (my choice) is copper wire, sometimes silver-plated depending on the color, and always coated with a nylon-based enamel to keep it from tarnishing. It is sturdy in the larger gauges, and soft enough to bend with your hands. Continue reading

Double spiral links

These earrings are made with silver art wire, sterling headpins/earwires and pearls.

These earrings are made with silver art wire, sterling headpins/earwires and pearls.

I have been making spirals for years, but always wanted to make one with two loops, one on the top and one on the bottom. Make two spirals and lash them together to create a link with two loops, following these easy step-by-step instructions. Continue reading