Make two necklaces with one custom bead mix

Each container of our bead mix yields enough glass beads to create a collarbone length necklace and a long necklace. Your kit includes the following items: five feet of 49-strand, .015 bead cable; two clasp sets; crimps and a pendant array with three pair of leaf beads. Glass bead mix color shown: Tourmaline.

Before you start, have the following items on hand: wash cloth on which to place beads or work; needle-nose pliers for crimping; scissors; tape measure; light source; sight aids as needed; small shallow bowl for bead mix. Skill needed: ability to finish a strung necklace with crimps. If you need a refresher course on crimping, search for and review an online tutorial before undertaking this project.

Begin choosing and stringing beads from the mix bowl
Pendant and pairs of leaves in necklace front

First, make a short necklace

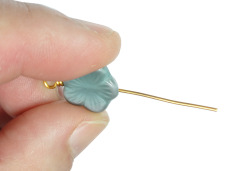
Pour your mix into a small shallow bowl. We’ll begin by making a short necklace with a central pendant and leaf elements. For a 17″ to 18″ long necklace, cut a cable length of 24 inches — that’s the necklace length plus 3 inches on both sides for finishing. Start by threading the central pendant by its jumpring, then, on either side, add beads of equal size, smallest leaves, equal size beads, large leaves, equal size beads, medium leaves. Check carefully that each side of this central arrangement is of equal length and that the leaves face the same way on both sides. (I confess that when I was preparing this demo I placed some elements wrong and had to unstring and restring the array correctly. You really don’t want to do that, so check your work!).

Pick the largest beads from the bowl, and place a small “E” size (4mm or so) bead between each of the larger beads as you go. Beads decrease in size as you add them to the ends. For best results, the colors don’t have to match on either side but the parallel strands of beads you are creating should have plenty of contrast and a good balance of elements.

Strands should have contrasting beads and good balance between sides. With a bead mix, they don’t have to ‘match’, just look good.

Get out your measuring tape. When you have about 8 inches on each side of the pendant, string only the small “E” beads to 8-1/2 inches on each side, for a 17 inch necklace. Secure one end, thread a crimp onto the other, add one end of clasp through the jumpring, thread back through crimp, crimp and trim. Hold necklace by other end, make sure there are no gaps, thread on other part of clasp though its jumpring, crimp and trim. Congratulations, you’ve completed a nice short necklace.

Now, make a long necklace with remaining beads in mix

The leftover beads in your mix will go into a long 28 to 30 inch necklace. This necklace won’t have a pendant, start with the largest beads, with “E” beads between them and go from largest to smallest.

Pick out the remaining larger beads from the bowl and lay them on a washcloth. Start the long necklace by choosing the largest bead, adding smaller beads on each side and using up the large beads, always with an “E” bead between them. When you run out of the larger beads, keep stringing the smaller beads on each side, selecting the smaller beads to contrast with each other until you have about 3 to 4 inches left on either side. Finally, finish with a series of three “E” beads on each side, check that both sides are equal in length, and crimp with clasps as for the first necklace.

Place small beads from bowl between all the larger beads.
Start with big beads
End with smaller beads
Now you have a smaller necklace and a larger necklace, to wear together or separately.

Choices

With your kit, you may choose to make a longer necklace with the pendant array (instead of the shorter one), a shorter necklace with no pendant array, or two necklaces without pendant arrays. If you have your own favorite center focal bead for the middle, start your necklace with it.

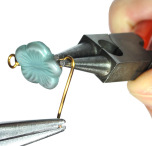
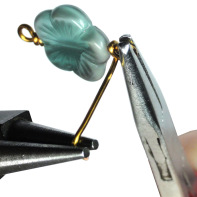
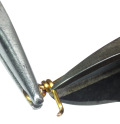
Notice that the pendant and the clasp set all have jumprings to thread onto the cable. The jumprings may be opened with two needle nose pliers to substitute another clasp or pendant if, after you make the necklace, you find a prettier clasp or pendant to replace the ones on the necklace. Jumprings make everything work better.

Bejeweled Treasures bead mixes are available in a wide assortment of colors at Bowerbirds’ bead shows and online at my Etsy store, click here to see our bead mixes.

Make simple loops

Make simple loops

Making a simple loop is essential to producing durable and professional quality jewelry. For this skill you will need three tools: round-tipped( also know as ‘rosary’) pliers, chain-nose pliers, and as good a wire cutter as you can afford.

The photos show step-by-step how a bead link with two simple loops is created. However, the method I’m teaching here will work whether you make two loops with wire and a bead to create a link, or you make a headpin-based dangle earring with one loop at the top.

1. Round-tipped or rosary pliers, for forming curves and loops. 2. Chain-nose or needle nose pliers, for bending straight angles, opening and closing completed loops, and holding objects. 3. My personal wire cutter, “Mr. Chompy”. 4. Miscellaneous objects to use as mandrels or forms for different loop sizes than the round-tipped pliers.

Make simple loops using 20 gauge or heavier wire, because a lighter gauge of wire may be too weak to hold the shape of a simple loop. Use the heaviest gauge wire that will go through a bead (usually 20 gauge wire).

Hold the spool and the end of the wire firmly in one hand, and use tools with your other hand. Thread bead onto wire. Snip off the end tip with your flush cutters so that the end is clean-cut. The wire should stick 3/8” (or 11mm) out of the bead.

Bracing with your hand holding the bead on its wire, use your chain-nose plier to bend the 3/8” length of wire at a 90 degree angle, pointing away from you. The 90 degree bend starts where the wire comes out of the bead. Your tool hand is palm upwards. Your other hand braces the work. After you’ve made the angle bend with the needle-nose pliers, change to the round-tipped pliers to make the loop shape. To start, gently grab the tip of the wire with the round-tipped plier. 

Curl the wire over the curved back of the plier’s top jaw by curling your tool hand towards yourself. When making this movement, I think of an ocean wave curling towards the shore.

You have created the loop shape. Gently nudge the wire end towards where the wire is coming out of the bead, and nudge it so it touches the end of the bead and is closed. Inspect the shape of your loop to ensure it looks like a round balloon, not a letter P or off-center. If your loop isn’t perfectly centered above the bead, adjust its position with the chain-nose pliers.

To complete your link, turn your work upside down and repeat the steps listed above. If you’re making a loop for a headpin earring dangle, make sure the beads are pushed all the way down the headpin, no gaps, before you make a loop.

Here is how you manage opening and closing the loop without ruining its shape. Use the needle-nose pliers to open and close your loops. Push the wire end forward like opening a door, and push it firmly closed when you are done. Always check your work to ensure the loop is really closed, otherwise it may fall off what it is linked to.

Practice makes perfect, so use inexpensive art wire and base metal headpins to get your technique right, before using more expensive metals. Above all, work methodically, step-by-step, don’t try to combine steps, and – most importantly – use the correct tool for each step. Learn to make simple loops, whether you use my method or another method that you find elsewhere that works better for you, whatever it takes.

Always check your work.

As well as making your work more durable, good simple loops simply looks better, and shows professionalism, pride in your workmanship and solid mastery of technique. Happy beading!

Make a Leaf and Nested Cup Flower Earring

Make a Leaf and Nested Cup Flower Earring

Here is a project using wirework to create dimensional floral earrings. I’m showing specific beads for this example, but you can use other colors as long as the bead shapes are as described here.

What you’ll need to get started

You’ll need the following materials: about 3 ft. of 26 gauge art wire; a pair of 14K goldfilled earwires, a pair of 10mm and of 14mm center-drilled cup round flower beads, a pair of small 3mm firepolish beads; a pair of 18mm flat leaf beads, drilled front to back, and (optional) a pair of small closed jumprings if you like a metal accent spacer element. Use these tools: round-tipped and needle nose pliers, to form the loops at the the top of the earrings, and nail clippers or wire cutters, to cut the wire at the start.

Design and preparation

I offer kits with the beads chosen already in different color ways. If you are choosing the bead colors, experiment, place them together temporarily before settling on your choice. Make sure that the nesting cup flower beads and the little 3mm round bead contrast with one another (contrast is what I aim for when I design). Keep trying till the color combination looks good to you. When you have your beads figured out, lay them out on a paper towel or piece of cloth.

Step-by-step instructions

1. Cut two 8-1/2” lengths of 26 gauge art wire. Fold one length in half. Thread one 18mm leaf in the middle of the fold, pinch lightly and twist twice so that the leaf is secure and doesn’t flop around, then wrap one strand of the wire tightly around up the other strand to an eighth of an inch. Make sure the front smooth side of the leaf is forward. Take the end of the wire and bend it outward at right angles to the central axis formed by the other wire. You will thread the nesting beads onto this wire.

2. In the order shown, thread on the 14mm bead, the 10mm bead, an optional tiny jumpring, and the 3mm small bead. Using your hands, gently bend the wire back over the 3mm bead  and thread it through the 10 and 14mm nesting beads and the small jumpring. When the small 3mm bead is nestled into the 10mm cup flower, pull the wire snug, using any pliers.
3. With your hands, adjust so that the nested flower and the 18mm leaf are facing forward in the same direction. Wrap the wire coming out of the back of the flower around the central axis wire, twist wire around central axis for about 1/8”. Now, smooth both wires together and twist evenly to make a length about an inch and a half. For best results, when twisting, hold the earring’s body still with one hand and do the wire twisting with your other hand.

4. A tidy round loop adds much to the appearance of the earring. Here’s a loop-making method I like: using the needle-nose pliers, make a bend to the right just above the outer edge of the center flower. Using the round-tipped pliers as a mandrel, form a loop. Insert ear wire in the loop. Check that the ear wire has no gaps for the earring to fall out of, and close the earwire tighter with needle-nose pliers if necessary. Holding the loop flat in the jaws of the needle-nose pliers, twist wire end two or three times. Trim it neatly in the back.

Repeat steps 1-4 to make the second earring of the pair. I hope that I have shown you some new ways to use dimensional cup flower and leaf beads. As always, use the techniques you’ve learned here to add dimension and floral flair to your own designs!

The Czech glass flower and leaf beads shown in this tutorial are available in many colors, or in materials kits, at Bowerbirds’ Etsy site, bowerbirds.biz.
 

Wrapped Loops

Wrapped Loops

You can create your own wrapped loops!

The photographs are of work with 20 gauge wire, although the technique can be used with other gauges of wire.

You’ll use three tools:

1. Round-tipped pliers sometimes called “rosary pliers”
2. Chain-nose or ‘straight’ pliers
3. Good flush cutter (a wire cutter capable of cutting cleanly, the best you can afford)


To start a wrapped loop, bend 1-1/4” of wire at an L-shaped angle with your chain-nose pliers.


Right at the bend, grip gently between jaws of round-tipped pliers. Bend the angled inch of wire over the top of one of the round-tipped pliers’ jaws.


You’ve made the top part of the loop, now make its underside. Take the top jaw out of the wire. Wrap under and around the lower jaw to form the underside.


Hold the loop in a gentle grip with your chain-nose pliers, lengthwise. With the very tip of your round- tipped pliers, grab the little tail and wrap twice, two neat wraps at the base of the loop.


After you’ve wrapped the loop, use your flush cutter to trim off excess wire.


If you’re making a link with wrapped loops on either end: thread the bead onto the wire with the wrapped loop you’ve just made, and pinch the bead so that its base is firmly against the wrapped loop.


Bend the wire coming out of the bead at an angle, wrap over top and bottom of the jaw of the round-tipped pliers and wrap twice around, just as you did at the beginning of making the link. Work step-by-step, and use the proper tools at each step, and you will have consistent and attractive wrapped loops.

Make a five-petaled flower

Make a five-petaled flower

five-petaled flower earrings

Make a pair of five-petaled flower earrings!

Wire together five top-drilled beads to make a graceful five-petaled flower.

  • Skills needed: use of round-tipped and chain-nose pliers, and wire cutters
  • Tools: round-tipped pliers; flush cutters; chain-nose pliers
  • Materials (for pair of earrings)
  1.  two 20″ lengths of 26 gauge art wire
  2.  pair of earwires to match wire color (can be sterling silver, 14K gold-filled, or niobium, whatever matches best.
  3. eight matching 4 or 6mm pearls or round beads
  4.  ten matching beads, top-drilled side to side (briolette style).

    Top-drilled beads good as petals

    Use any top-drilled bead as a petal

Continue reading

Treason of clerks

Treason of clerks

Czech opaline glass bead stack

More massive than these, even.

In each year’s September ritual, standing in line at the supermarket, five years ago, I hoisted a copy of the big Vogue Fashion Week issue.

The customer in line in front of me wore a ethereal lilac cotton tiered skirt paired with a top in a hard blue, black and white geometric pattern.

The first pages I flipped to were a four-page layout promoting the concept of football motifs as fashion assets. Just, no.  Expensively produced ad urging women to spend top dollar on outfits with big numbers and sullen team colors. Maybe it was seeing the ad just after that brutal blouse/ floaty skirt combination, whose colors weren’t on speaking terms. I went into a spiral of eye grief. As an art jewelry merchant, I was dismayed to see that most of the models in the editorial section of the magazine wore no necklaces, not even ugly ones, — not even with V-neck or deep decolletage necklines that could have used the visual break.

One spread showed an annoyed-looking young woman with duellist’s eyes, posing in a series of expensive-looking locations, wearing graceless clothing and large shoes, her hair raked back into an upright ponytail. Rather than being glorified, her youth and beauty were put into the service of an inexplicable vision of ugliness.

I have weathered sparse fashion eras before–which I define as a dearth of good-looking, easily available art jewelry and clothing– but I really thought in 2014 we had hit rock bottom. Five years past my eye grief moment, experience shows me that curiosity about why things happen make things endurable.

The world moves on. It is possible that for various lifestyle, political, and economic reasons, fashionable women have no wish to wear jewelry which suggests sumptuousness, art, art history, or the richness and colors of nature. The Belle Epoque rested on a solid financial cushion produced by a backdrop of colonial oppression and colonialism. The 1950’s made even thin women wear girdles, and all women wear high heeled shoes so it wasn’t an unmitigated paradise of costume jewelry.

Also, it’s impossible to want what you don’t see. The internet places a visual treasury in our hands, but if you don’t know what to ask for, names such as Miriam Haskell (fl. 1930’s -1960’s) or Stephen Dweck (ca. 1990) mean nothing.

Yes I’m writing this essay on a screen. The visual and physical world, human presence, is ignored almost to an anchoritic degree. If something beautiful is not on a screen,  it is deemed worthless, whether it be sunlight on healthy living beings, or an opaline glass bead, or a flower, or a bead shaped like a flower,  or so it seems in my more paranoid moments.

The unrivalled ability of search engines to answer questions and find beauty is useless without having any idea what to ask for. Many students these days are denied standard-issue education in the visual arts, for some reason I cannot fathom, so how can they ask for names and images they never heard of?

A desert is forming: self-reinforcing visual sterility, ignorance of ignorance.

Jittery, patterned fabrics in harsh colors unkind to all complexions suggest the formation of an esthetic based on digital imagery rather than the older standard of beauty based on nature as inspiration. The women’s football clothing ad may have been a fluke but it suggests an ‘if you can’t beat ’em, join ’em’ resignation. Or maybe the NFL was trying to shore up business that year, spent big bucks on advertising, who cares how anything looks?

When colors are quantified into approved yearly color groups (which to my eyes always look like the same set of colors under different names, but it could just be my screen) set by a company I used to know as a color ink matching service for offset printing, a vacancy at the top is suggested.

There is an old term for the acts of literate thinkers who failed to provide help to their illiterate brethren when it was in their power: trahison des clercs, or treason of clerks. (‘Clerk’ was the going term for the literate in general, when they were in the minority.) I believe that humans have a thirst for beauty and personal presence during their brief lives which is being denied for various spurious reasons such as ‘edginess’ by designers who have the potential to do better.

I would love to be proved wrong, or to prove myself wrong.

Continue reading

Make ‘Clotheshanger’ Loops for Side-to-Side Drilled Beads

Use your leaf, dagger and other side-to-side drilled beads to create attractive dangles.

If you create a loop with angular straight sides, you can add a wide variety of side-drilled beads to your jewelry designs. I made this pair of earrings using 26 gauge wire. Grab a pair of straight pliers and try this wirework technique to add to your jewelry making skills.

Tools needed:

You’ll need a pair of needle-nose (straight) pliers and a second pair of any kind of pliers as backup.

Here’s how the clotheshanger loops and dangles look, up close.

The following picture is a step-by step graphic showing the bends you need to make on the wire with straight pliers. For better visibility I’ve used heavier wire, 20 gauge in this photograph. When I made the example earrings, I used 26 gauge gold art wire and 7 x 12mm leaf beads, not the 20 gauge dark wire and wide petals you see in the step-by-step graphic.

Make three angular bends, then wrap.

Cut a piece of wire about 5 inches long. 1. With the straight pliers, bend the bottom two inches to a 45 degree angle. 2. At about three-eighths or a quarter inch after the first bend, bend again. Thread a side-drilled bead on. 3. The third bend should be done at a length so that a flat triangle with equal sides is formed. 4. Between the jaws of the straight pliers, keep a firm hold on the spot where the wire crosses the top of the triangle. While keeping a stable hold and not allowing anything to move, wrap the end of the wire two or three times around the upright wire and trim. If the triangle clotheshanger shape is wonky, straighten and sharpen the corners with the straight pliers.

Your clotheshanger dangle is done! Now you can add beads to make the main body of your earring, finishing the link using the conventional wrapped loop technique. Add more links as desired, and add earwires.

14 K gold filled earwires, top links, main links and side-to-side drilled bead dangles.

Announcing the Czech bead final four face-off!

group shot of beads

Welcome to the jungle, baby.

Mid-Summer for me is the perfect time for idle Internet contests and quizzes of the “Which apex predator am I the most like?” variety. Here’s my bid for your summertime clicks, with a cause we can all support: four major types of Czech glass beads vying for dominance, paired as follows: Continue reading

Wire up a pendant with a Czech button

Wire up a pendant with a Czech button

Front view of pendant

Front view of pendant

Here is a way to use Czech buttons and wire to make a pendant. You will need 18 gauge wire for the frame and 26 gauge wire to secure the button to the frame. In this example I use art wire, although you may choose to use sterling silver, 14K gold-filled, or copper wire.  Art wire (my choice) is copper wire, sometimes silver-plated depending on the color, and always coated with a nylon-based enamel to keep it from tarnishing. It is sturdy in the larger gauges, and soft enough to bend with your hands. Continue reading